Uploading videos and imagery with GPS
1. Uploading video with GPS
OcuMap supports any video file in .mp4 format with GPS. The GPS data file needs to be in one of the following formats, simple text format (txt), comma delimited format (csv), SRT, or GPX. Depending on how the GPS data was collected, camera-specific steps are available for the LadyBug Camera, Garmin Virb360 and GoPro cameras.
Both SRT and GPX files can be directly uploaded as listed below:
- Create a new project or select an existing project folder where the GPS video will be uploaded to.
- Select the settings tab and chose the type of view mode required, (flat, spherical (360), or Cylindrical)
- Go back to the projects tab and click upload.
- Select the videos tab and then video with GPS.
- Drag & Drop the mp4 video file with the associated GPX or SRT file.
- Once the video is uploaded, you can rename it.
- Upload
- Your file will be visible under the folder and can now be viewed.
2. Uploading imagery with GPS
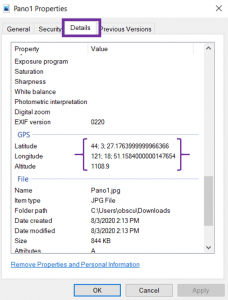
Before you upload your GPS imagery, You can confirm if it contains GPS metadata as follows:
- Right click on the image.
- Go to properties, then details tab.
- Scroll down until you see the GPS section
To upload GPS-based imagery,
- Select the folder you want to upload photos to.
- Click on the settings tab and make sure the folder view mode is set to Flat.
- Click on the upload icon.
- Drag and drop images, or select from the add a file button.
- Edit image name if needed.
- Click the upload bottom.
- Your images will now be shown in the folder.
3. Using the GPS parser function
The GPS parser tool is used in conjunction with video files. It helps tie the video time frame with it’s location on the map. To use this tool follow these steps;
- Select the project folder where you want to upload your video with GPS
- Select the Videos tab from top, then Video with GPS option.
- Upload your video file.
- Expand the GPS parser button.
- Copy the GPS data from your local file (typically csv format), and paste it into the CSV section.
- OcuMap will automatically detect the column values for Lat,Long and Alt.
- Click on the settings tab. This is where you can see the column values for each parsed GPS reading.
- Specify the Time column from your CSV file and enter the time unit.
- Click on the Results tab to check if your data parsed correctly, if not, go back to settings and change the column index values as needed.
- If the results look correct, click on “Add Parsed GPS”. Now your GPS data file is parsed correctly with the uploaded video file.
- Click Upload
- Your video with GPS will now be shown in the folder.
4. Uploading GPS Images and Videos from a Flir-LadyBug Camera
You can seamlessly upload Panoramic Imagery and or Panoramic Videos collected with a Flir-LadyBug camera system as follows:
- Select the project folder where you want to upload your GPS-videos or images
- Select the Videos tab (or images tab) from top. If you are uploading an mp4 file, then select Video with GPS option, otherwise, drag and drop your Ladybug images and click upload.
- Drag and drop the GPS frame information (.txt file) along with the video.
- Click Upload
- Your video with GPS will now be shown in the folder.